
Thursday, October 17, 2013

Wednesday, October 16, 2013

Wednesday, March 16, 2011
Program for Currency Conversion
Program that converts the older Pound money system to the latest one.
#include
using namespace std;
void main()
{
int shilling=0,pence=0,pounds=0;
cout<<"Enter Pounds: "; cin>>pounds;
cout<<"Enter Shillings: "; cin>>shilling;
cout<<"Enter Pence: "; cin>>pence;
float ans=(float)pounds + (float)shilling/20 + ((float)pence/12)/20;
cout<<"Conversion yields: "<
}
#include
using namespace std;
void main()
{
int shilling=0,pence=0,pounds=0;
cout<<"Enter Pounds: "; cin>>pounds;
cout<<"Enter Shillings: "; cin>>shilling;
cout<<"Enter Pence: "; cin>>pence;
float ans=(float)pounds + (float)shilling/20 + ((float)pence/12)/20;
cout<<"Conversion yields: "<
}
Tuesday, March 15, 2011
Program that takes input in Celsius and converts to fahrenheit
This is a beginner program which prompts user to input temperature in Celsius and outputs the temperature in Fahrenheit.
#include
using namespace std;
void main()
{
float fahrenheit=0.0, celsius=0.0;
cout<<"Enter Teperature in Celsius: "; cin>>celsius;
fahrenheit = ((celsius + 32)*9)/5;
cout<<"\nIn Fahrenheit: "<< fahrenheit;
}
#include
using namespace std;
void main()
{
float fahrenheit=0.0, celsius=0.0;
cout<<"Enter Teperature in Celsius: "; cin>>celsius;
fahrenheit = ((celsius + 32)*9)/5;
cout<<"\nIn Fahrenheit: "<< fahrenheit;
}
Monday, March 14, 2011
C++ program that converts Dollars in Yen,Pounds,Francs etc
This is a beginner question, write a program that takes input in Dollars and converts them in Pounds, Yen etc and displays it. Here is how I have written it
#include
using namespace std;
void main()
{
float number=0.0;
cout<<"Enter Amount in Dollars: "; cin>>number;
cout<<"Conversion in:\nPounds: "<
#include
using namespace std;
void main()
{
float number=0.0;
cout<<"Enter Amount in Dollars: "; cin>>number;
cout<<"Conversion in:\nPounds: "<
Monday, March 7, 2011
Writing, Deploying and Consuming a Web service in .NET
Suppose you want to write a web service that can send email and consume or use this web service in you C# application.
First off with writing the web service. For a detailed and basic version of the tutorial on how to write a web service, you can visit the following link.
Tutorial: Writing a web service
So we'll start by writing a web method that can get email address of the receiver, Subject of the email and Message as parameters and returns a message whether the email has been sent or not.
Here is what we'll need for the implementation of such a method.
[WebMethod]
public string sendMail(string mailTo, string emailSubject, string emailBody) {
MailMessage nmail = new MailMessage(); //Create a new mail message
nmail.From = new MailAddress(/*Your email address*/); //Set Sender's email address
nmail.To.Add(mailTo); //Set Recipient's Email address
//Note: you can add multiple Recipients
nmail.Subject = emailSubject; //Set subject of the email
nmail.Body = emailBody; //Set the body of the email
SmtpClient smtpClient = new SmtpClient(/*"127.0.0.1" or localhost or the IP or your server */); //Initiate SMTP client for your Server
try{
smtpClient.Send(nmail); //Send Email
}
catch(Exception e)
{
return “Error Occured”;
}
return "Mail Sent";
}
Also you will need the following dlls at the start of your code to make the above code executable
using System.Net.Mail;
using System.Web.Services.Protocols;
After this compile your code and see if it works fine, next step is to deploy your web service. Following tutorial describes how to deploy your web service.
Tutorial: How to Deploy your web service
Now once you have deployed your web service by the use of above tutorial. Next step is to consume it using your C# Forms application. So now open a new Visual C# Windows Application project. Make the form design as an email form with the labels of to, subject, message and a button which when pressed tries to send the email. My form looks like this.
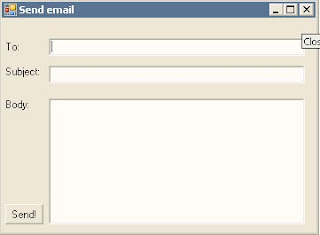
Now you have to add the web reference to your application as shown in the figure below.

Right-Click References in the Solution Explorer and click Add references.Click on the link web service on the Local machine. This will display all the web services that are currently deployed on your IIS.


Select the one you just made and give it a reference name. In my case, I have given it a name “serv”. Click add reference.
It will appear under your refernces as

Now to the handler of the send button, you will have to initialize your service with the name you gave while adding reference. Like this
serv.Service snd = new sendemail.serv.Service();
Form the object snd you can call all the methods that are tagged as [web method]
String response=snd.sendmail(textBox1.Text, "", textBox3.Text, textBox4.Text);
You can show the string message returned by the service in the message box as follows
MessageBox.Show(response);
First off with writing the web service. For a detailed and basic version of the tutorial on how to write a web service, you can visit the following link.
Tutorial: Writing a web service
So we'll start by writing a web method that can get email address of the receiver, Subject of the email and Message as parameters and returns a message whether the email has been sent or not.
Here is what we'll need for the implementation of such a method.
[WebMethod]
public string sendMail(string mailTo, string emailSubject, string emailBody) {
MailMessage nmail = new MailMessage(); //Create a new mail message
nmail.From = new MailAddress(/*Your email address*/); //Set Sender's email address
nmail.To.Add(mailTo); //Set Recipient's Email address
//Note: you can add multiple Recipients
nmail.Subject = emailSubject; //Set subject of the email
nmail.Body = emailBody; //Set the body of the email
SmtpClient smtpClient = new SmtpClient(/*"127.0.0.1" or localhost or the IP or your server */); //Initiate SMTP client for your Server
try{
smtpClient.Send(nmail); //Send Email
}
catch(Exception e)
{
return “Error Occured”;
}
return "Mail Sent";
}
Also you will need the following dlls at the start of your code to make the above code executable
using System.Net.Mail;
using System.Web.Services.Protocols;
After this compile your code and see if it works fine, next step is to deploy your web service. Following tutorial describes how to deploy your web service.
Tutorial: How to Deploy your web service
Now once you have deployed your web service by the use of above tutorial. Next step is to consume it using your C# Forms application. So now open a new Visual C# Windows Application project. Make the form design as an email form with the labels of to, subject, message and a button which when pressed tries to send the email. My form looks like this.

Now you have to add the web reference to your application as shown in the figure below.

Right-Click References in the Solution Explorer and click Add references.Click on the link web service on the Local machine. This will display all the web services that are currently deployed on your IIS.


Select the one you just made and give it a reference name. In my case, I have given it a name “serv”. Click add reference.
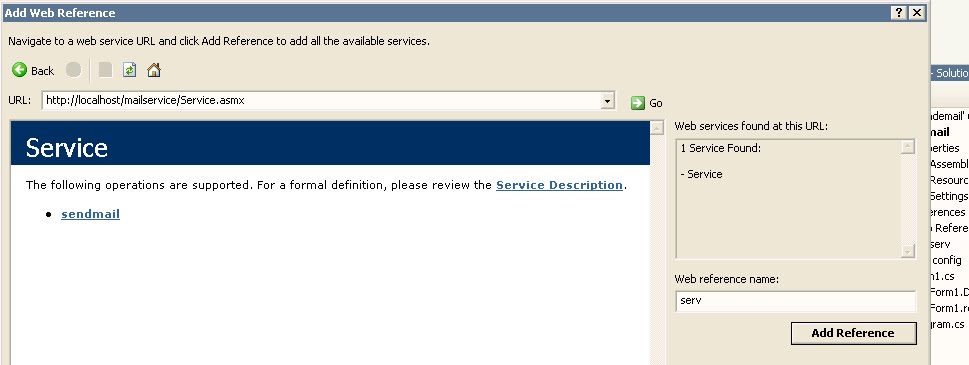
It will appear under your refernces as

Now to the handler of the send button, you will have to initialize your service with the name you gave while adding reference. Like this
serv.Service snd = new sendemail.serv.Service();
Form the object snd you can call all the methods that are tagged as [web method]
String response=snd.sendmail(textBox1.Text, "", textBox3.Text, textBox4.Text);
You can show the string message returned by the service in the message box as follows
MessageBox.Show(response);
Thursday, February 17, 2011
JSP Declaratives
Syntax for a JSP Declarative is:
<%!
//your java code here
%>
JSP Declarative begins with the sign “<%!” and ends with this “%>” . Variables and functions defined in the declarative tag are class-level i.e they define functions and variable at the global level and they can be used anywhere in the JSP page. The code in the declaration tag is not available inside the service method (_jspService()) of JSP.
<%!
public String add(int a, int b)
{
int c=a+b;
return c+””;
}
%>
<%
int firstNum=2;
int secondNum=5;
%>
<html>
<head>
<title>Declaration in JSP</title>
</head>
<body>
This sum is : <%=add(firstNum,secondNum)%>
</body>
</html>
Add Dynamic Content to your JSP page
As in the previous post, I showed that any HTML file can easily be turned into a JSP file i.e. by changing the file's extension to .jsp. So what is it that makes JSP useful that a simple html page? It is its ability to embed java code inside of JSP page. Following example shows how.
<HTML>
<BODY>
Hello World! The time is: <%= new java.util.Date() %>
</BODY>
</HTML>
Save the above file with .jsp extension. Now load it multiple times. You will see that every time you reload the page, it shows the current time.
We have already learned about java expressions <%= and %>
So that is what which makes JSP useful i.e. generating dynamic content that will change itself according to the client's request.
<HTML>
<BODY>
Hello World! The time is: <%= new java.util.Date() %>
</BODY>
</HTML>
Save the above file with .jsp extension. Now load it multiple times. You will see that every time you reload the page, it shows the current time.
We have already learned about java expressions <%= and %>
So that is what which makes JSP useful i.e. generating dynamic content that will change itself according to the client's request.
Tuesday, February 15, 2011
Writing your first JSP
JSP is used to simply put Java code inside the HTML pages. This means that you can actually take any of the existing HTML pages that you have and change their extensions to ".jsp" which are now ".html" or “.htm”.
So open notepad in windows. Write this
<HTML>
<BODY>
Hello, world
</BODY>
</HTML>
Save it with the extension of “.jsp". Now open this file in your browser.
The page will take a bit of time when it is loaded for the first time. After first time execution it will load normally.
So what basically happens when you try to load your page for the fist time?
JSP is turned into a Java file, which is then compiled and loaded. As you know well compilation for java only happens once, so loading it again and again does not take much time now. Remember, every time you’ll change or edit the JSP file, the same process will repeat itself i.e. first time compilation.
Next tutorial ill show what makes JSP useful.
Tuesday, February 8, 2011
JSP Scriptlets
Syntax of JSP Scriptlet is:
<%
//your java code here
%>
A JSP Scriptlet begins with the sign <% and ends with the sign%>. Java code can be embedded in the JSP Scriptlet. JSP Engine places the code present in the scriptlet tag in the _jspService() method of the JSP page. Variables that are available to the JSP Scriptlet are:
- request:
request is used to represent the client's request and is a subclass of HttpServletRequest. This variable is used to retrieve the data which was submitted along the request.
Example:
<%
//java code
String name=null;
name=request.getParameter("user_name");
%> - response:
response is subclass of HttpServletResponse. This is used to send a response.Example:<% response.sendRedirect(“nextPage.jsp”);%> - session:
session represents the HTTP session object associated with the request.Example:<%session.getAttribute(“attribute_name”);%> - out:
out is an object of output stream and is used to send any output to the client.
Example:
<%out.println(“Hello World”);%>
This will print Hello World on the web page.
Other variables that are available to the scriptlet are pageContext, application,config and exception.
Subscribe to:
Posts (Atom)